

Late October. You’re walking up to a friend’s house, and there on the front door is a Halloween wreath.. except it stops you for a second, because it actually looks good. Black velvet ribbon, deep orange roses, a little glint of a spider, all against a dark wood door. Not a plastic pumpkin in sight.
That was the exact moment I stopped rolling my eyes at Halloween wreaths. I’d written the whole category off as tacky orange blobs from the drugstore, the kind that shed glitter everywhere and look like a clearance bin exploded. Turns out I was just looking at the wrong ones.
The good Halloween wreath is a real thing, and it’s the fastest way to make your door feel festive without going full haunted house. This post is my full conversion story: why these wreaths got a bad name, the styles that actually look tasteful, two easy DIY versions, and answers to the buy-or-make questions. Your door is about to get a glow-up. A spooky one.
The Before: Why Halloween Wreaths Got a Bad Reputation
Let’s be honest about where the eye-rolling comes from. Halloween wreaths earned their reputation, and it’s worth naming before we fix it.
The Plastic-Orange-Blob Era
For years, the only Halloween wreaths you could find were stiff plastic rings covered in cartoon pumpkins and neon spiders. They looked cheap because they were, and they made every door they touched look like a party-store aisle. No wonder people skipped them.
What Actually Changed
Then the whole vibe of Halloween grew up. The “elegant Halloween” trend brought moody florals, matte black finishes, and refined color palettes into the mix. Suddenly a spooky wreath could look designed instead of dollar-bin, and the category quietly reinvented itself.
The Grown-Up Shift
Now the best Halloween wreaths borrow straight from the fall wreath playbook: grapevine bases, real-looking foliage, velvet ribbon, and restraint. If you loved the looks in my roundup of fall wreath styles taking over front doors, this is their darker, more dramatic cousin.
The other big change is where these show up. Party-forward homes used to save all the spooky energy for the yard, but a refined wreath brings just enough of it to the front door without committing to a full graveyard scene. It’s the low-effort entry point to Halloween decorating, which is exactly why the category exploded.
The After: Halloween Wreath Styles That Actually Look Good
So here’s the good news: a tasteful Halloween wreath is completely doable, and it comes down to two simple rules.
Rule 1: Pick One Theme
The tacky wreaths try to do everything: pumpkins AND bats AND spiders AND ghosts, all screaming at once. The good ones commit to one idea. A witch theme. A spider theme. A moody floral theme. Pick your lane and the whole thing instantly looks intentional.
Rule 2: Keep the Palette Tight
Black and orange is the classic, but the trick is limiting yourself to two or three colors and varying the textures instead. Matte black, glossy orange, a little glittered accent. That restraint is the entire difference between “designed” and “clearance rack.” (Turns out spooky and tasteful aren’t enemies after all.)
The Styles to Copy
Now the fun part: the actual wreaths worth hanging. These are the ones that made me a believer.
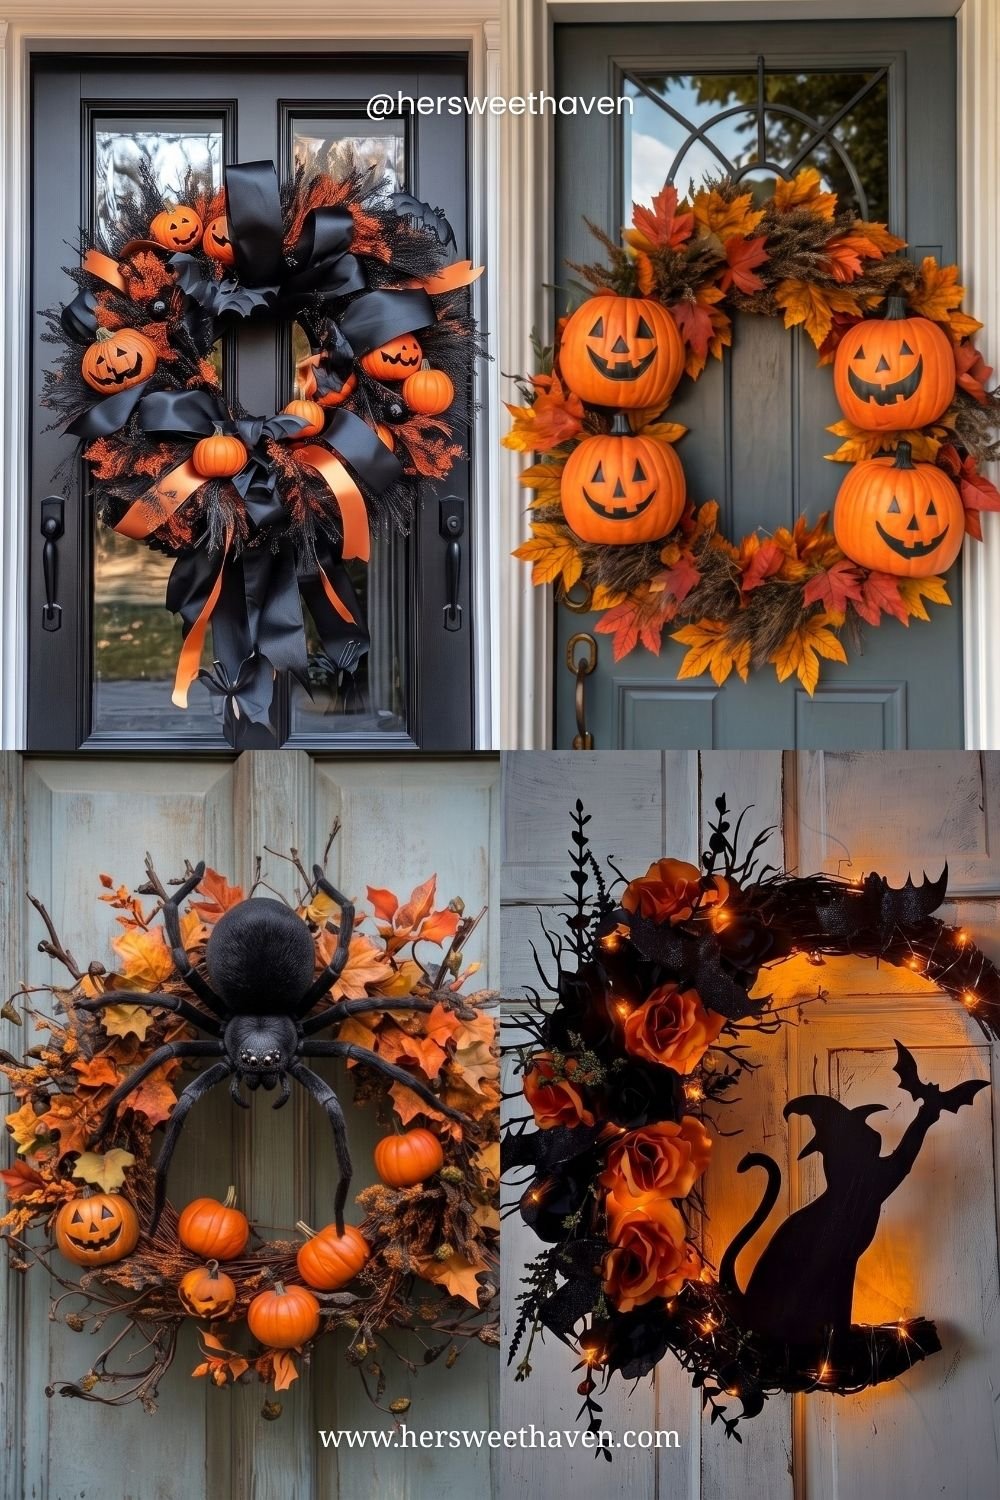
This collage covers the range beautifully. A dramatic black-bow-and-jack-o’-lantern wreath for a dark door, a cheerful pumpkin-and-leaf version that leans more fall than fright, a spider wreath with real presence, and a glowing black-cat silhouette with orange roses. Four totally different moods, all tasteful, all committed to one clear theme.
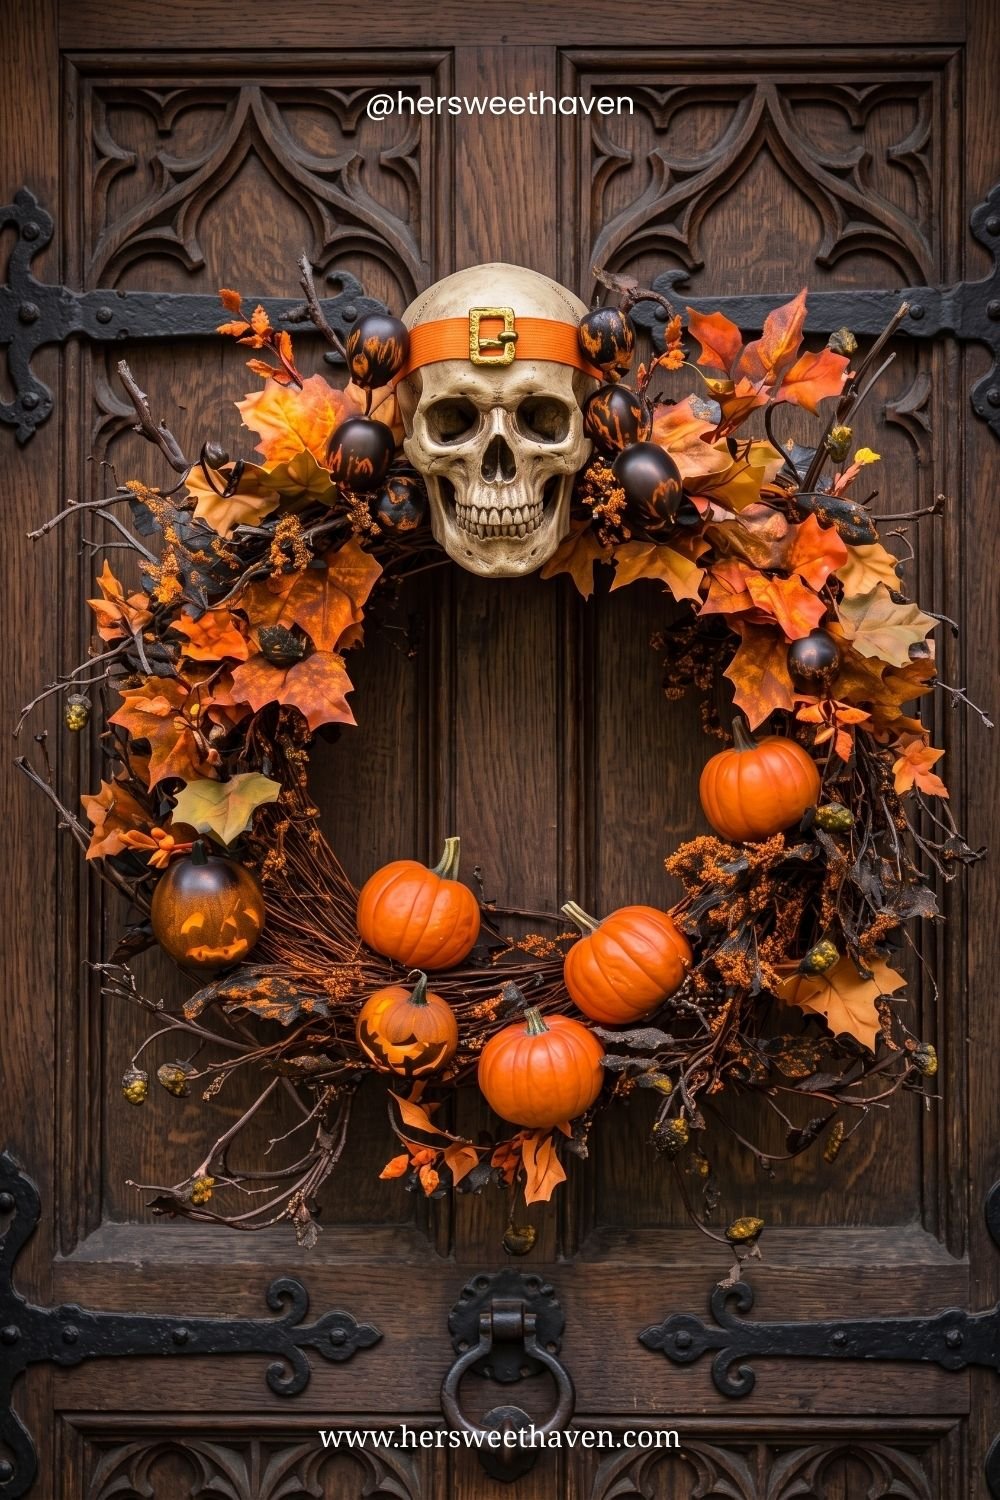
Or go full Gothic-glam like this skull-and-pumpkin grapevine on a carved wood door. The little buckled skull is playful, the pumpkins and autumn leaves keep it grounded in the season, and the natural grapevine base stops it from feeling like a costume. Moody, but still pretty. That balance is the whole game, and this roundup of DIY Halloween wreath tutorials has plenty more in the same tasteful lane.
The DIY Route (Two Ways, Both Easy)
Real talk: the boutique versions of these run $60 and up, and they’re genuinely simple to make yourself. Here are two beginner-friendly routes.
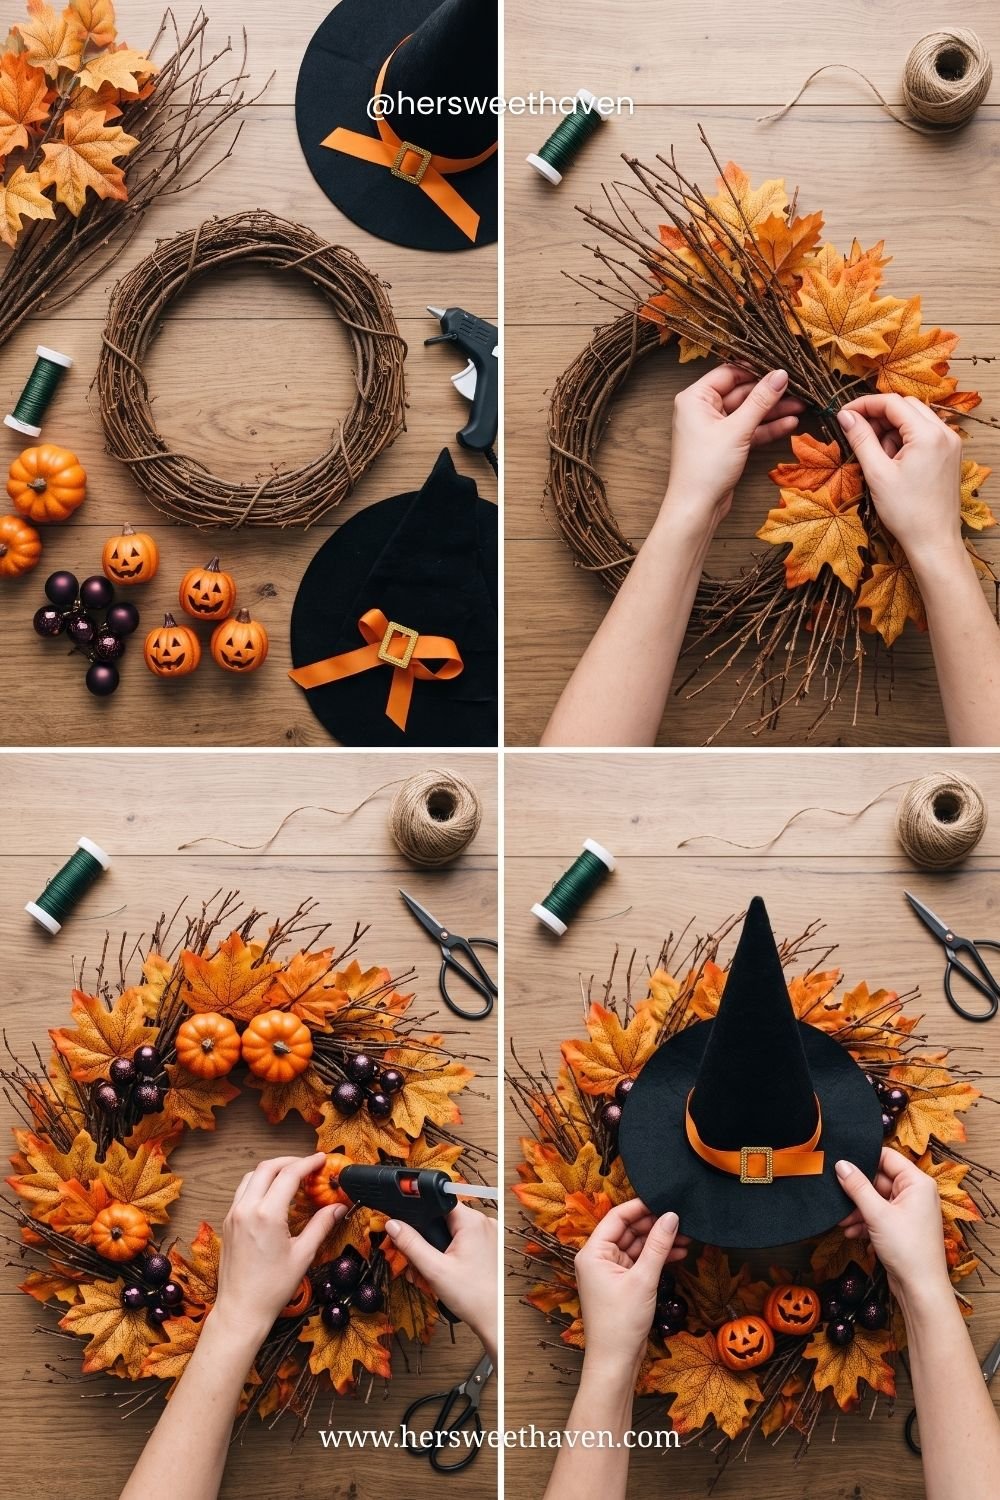
The Witch-Hat-and-Leaves Wreath
Start with a grapevine base, wire on bundles of twigs and orange maple leaves for a full, wild texture, then hot-glue mini pumpkins and dark ornaments around the ring. The finishing move is a black witch hat tucked at the top, which turns a regular fall wreath into a Halloween one in one step. This DIY witch hat wreath tutorial walks through the hat-attaching trick so it sits flat and secure.
The best part is how forgiving it is. Wild and layered is the look, so there’s no such thing as “messy” here. (If you can hold a glue gun, you’re qualified.)
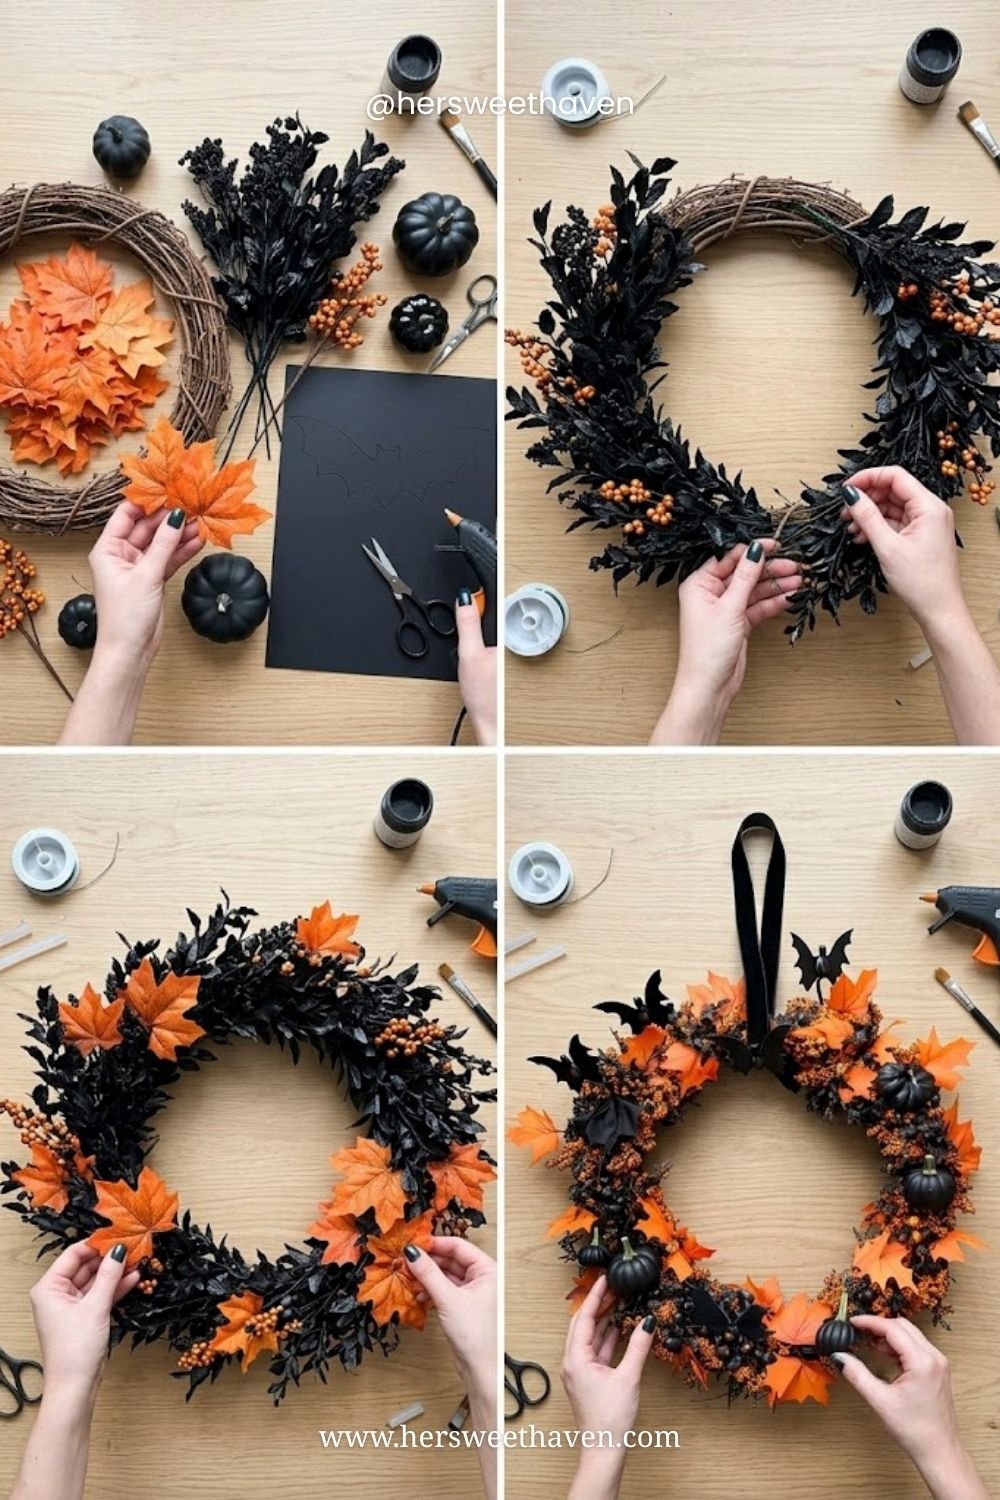
The Black-and-Orange Bat Wreath
For something moodier, build a base of black-painted foliage and orange berry sprigs, then layer in a few bright orange maple leaves for contrast, black mini pumpkins, and paper or felt bats. Finish with a simple black ribbon hanger. It reads modern and a little witchy, and it’s still just a grapevine ring underneath.
Black spray paint is the secret weapon in this one. It turns cheap dollar-store foliage into something that looks boutique for a couple of dollars.
If you want to take either wreath further, a strand of battery fairy lights woven through the base makes it glow at dusk, which is when trick-or-treaters actually see it. Tuck the battery pack behind the wreath and set it on a timer. It’s the same trick that makes party decor pop, and my Halloween party decor favorites lean on lighting for exactly this reason.
Your Halloween Wreath Questions, Answered
The three things people always ask once they realize a tasteful Halloween wreath is possible.
How Do You Make a Halloween Wreath Look Tasteful, Not Tacky?
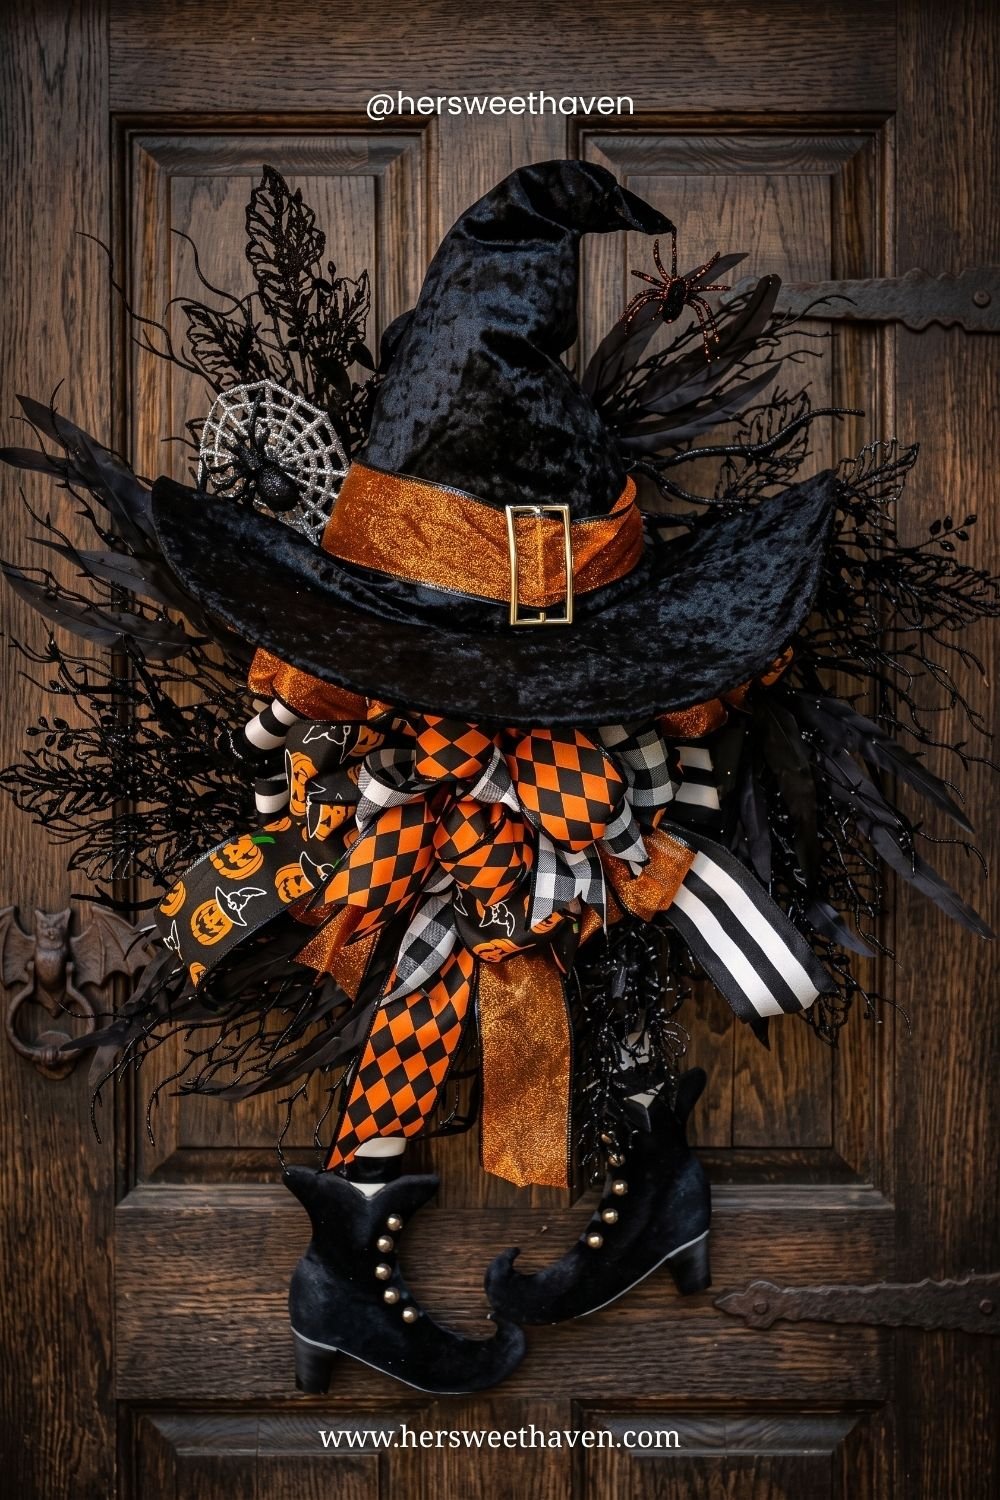
Texture over quantity, and one strong statement piece. Look at this witch-hat-and-boots wreath: velvet hat, mixed ribbons, black feathery foliage, dangling boots. It’s dramatic, but every element serves the one witch theme, and the matte-velvet textures keep it feeling rich instead of plasticky. Commit to a theme, limit your colors, and lean on nice materials like velvet, grapevine, and real-looking foliage.
How Much Does a DIY Halloween Wreath Cost?
Way less than buying one. A grapevine base runs a few dollars, and dollar-store foliage, a witch hat, and ribbon bring most projects in around $15 to $25 total. This Dollar Tree witch hat wreath tutorial keeps the whole thing under budget, which beats the $60-plus boutique price every time.
Can You Leave It Up All October?
For sure, and that’s the beauty of the fall-forward styles. A wreath heavy on leaves, pumpkins, and grapevine reads as autumn all month, then the witch hat or bats push it spooky for the final stretch. Faux materials hold up outside for weeks, especially under a covered porch, so one wreath carries you from October 1st to Halloween night.
Grab Your Supplies Before They Vanish
Here’s your friendly warning: the good Halloween wreath supplies disappear fast. Witch hats, black foliage, matte pumpkins, and grapevine bases start selling out at craft and dollar stores by mid-October, and the picked-over shelves are grim (the ironic kind of grim). If you’re planning to make one, this is your sign to shop this week.
Grab a grapevine base, a can of black spray paint, a witch hat, and a few sprigs, and you’re one cozy afternoon away from a door that stops people in their tracks for the right reasons. And once the wreath is up, my fall front porch styling guide finishes the rest of the entry. Go make the wreath. Convert a skeptic. It might be you.



Leave a Reply