
I’ll be honest with you. I spent weeks scrolling through high-end home catalogs, drooling over fire pits that cost more than my first car. Every time I found a design I loved, the price tag felt like a personal insult. I wanted that cozy, crackling atmosphere for my backyard, but I didn’t want to choose between a fire pit and paying my rent. It felt like the „perfect” garden setup was only for people with unlimited budgets.
Then it hit me. Why am I waiting for a store to sell me a lifestyle I can build myself? After a few failed attempts—including one where I accidentally used rocks that literally popped in the heat—I finally cracked the code. You don’t need a contractor or a thousand dollars. You just need a Saturday afternoon and about $80.
In this guide, I’m going to show you exactly how to build a stunning, safe, and long-lasting fire pit for under $100. We’ll talk about choosing the right spot, picking budget-friendly materials like bricks and mortar, and how to make it the soul of your next gathering. By the time you finish reading, you’ll have a clear plan to transform your garden into the ultimate hangout spot.
Planning Your Layout: The Secret to a Professional Look
The biggest mistake I made at first was just throwing stones in a circle and hoping for the best. It looked… well, it looked like a mess. To get that high-end look on a budget, you have to start with a solid plan. First, find a spot that is at least 10 to 15 feet away from your house, low-hanging trees, or wooden fences. Trust me, you don’t want your „relaxing” night to end with a call to the fire department.
Think about the flow of your yard. Do you want the fire pit to be a hidden nook or the center of attention? I realized my yard felt much bigger once I tucked the fire pit into a corner that was previously just dead space. Once you have your spot, use a piece of string and a stake to mark out a perfect circle. A diameter of about 3 feet is the „sweet spot” for most gardens. It’s big enough for a real fire but small enough to keep the material costs low.

I love how this inspiration photo uses simple wooden pallets to create high-end seating around a stone pit. The string lights above really show that you don’t need a huge budget to create a magical atmosphere.
Choosing Your Materials: Bricks, Stones, and Staying Safe
Now, let’s talk about the actual stuff you need. If you go to a fancy landscaping store, they will try to sell you „fire pit kits” for $500. Ignore them. You can get incredible results using reclaimed bricks, concrete pavers, or natural fieldstone. I found a neighbor giving away old bricks on a community app, which saved me a ton of cash.
The most important thing to remember is heat resistance. Standard rocks from a riverbed can trap moisture inside. When they get hot, that moisture turns to steam and can cause the rock to crack. Stick to kiln-fired bricks or concrete blocks specifically rated for outdoor use. If you want it to last forever, a small bag of mortar is a great investment. It’s designed to handle high temperatures and will keep your bricks from shifting over time.

Check out the beautiful stone path leading to this classic fire pit; it makes the whole area feel like a destination. Using dark Adirondack chairs is a smart move because they look elegant and stand up well to the elements.
The Build: A Step-by-Step Saturday Project
Once you have your materials, it’s time to get your hands dirty. Start by digging out your circle about 6 inches deep. To be honest, I tried to skip the digging part once, and the fire pit just looked like a pile of rubble sitting on the grass. Digging into the ground gives the pit stability and helps contain the ash.
Fill that hole with about 4 inches of paver sand or crushed gravel. This is a big deal because it provides drainage. Without it, your fire pit will turn into a puddle every time it rains. Level the sand carefully—if your first layer of bricks is crooked, the whole thing will look wonky. Lay your bricks in a circle, leaving tiny gaps between them for airflow. Fire needs oxygen to breathe, just like we do!

This modern design shows how you can use a curved sectional sofa to maximize seating in a small space. The built-in pergola with lattice walls offers privacy while still feeling open and airy.
If you’re using mortar, apply a thin layer between each course of bricks. You only need to go about three or four layers high. Any higher, and it becomes hard to actually see the flames when you’re sitting down. I’ve noticed that a lower profile actually feels more intimate and campfire-like.

This sleek, square fire pit is a great example of a minimalist, contemporary look. The built-in stone bench with plush cushions creates a permanent outdoor living room feel.
Creating the Vibe: The Center of Your Social Life
A fire pit isn’t just a hole with fire in it; it’s a gathering place. I remember the first night I lit mine. I invited a few friends over, we roasted marshmallows, and for the first time in months, nobody looked at their phone. The fire creates a natural „center” that makes people feel comfortable and open.
To really level up the space, think about the lighting and seating. You don’t need expensive outdoor furniture. Logs, large flat stones, or even DIY benches made from 2x4s work perfectly. I added some solar-powered string lights to the trees nearby, and it changed the entire mood for about $15. It’s those small, thoughtful touches that make a $100 project look like a $1,000 renovation.
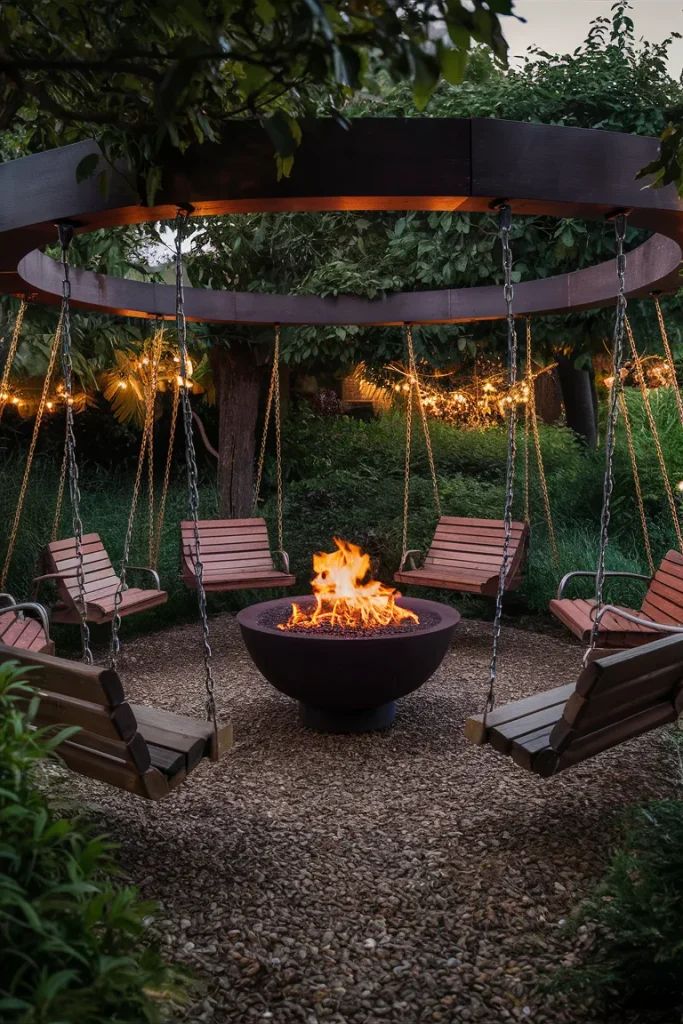
How incredible is this setup with the swinging chairs? It’s such a playful and unique take on fire pit seating. The circular overhead frame ties the whole design together and makes it feel like a private oasis.
Pro Tips for Your DIY Fire Pit
Building the pit is only half the fun. Here are a few things I learned the hard way that will save you time and stress:
- Keep it Clean: Scoop out the ash regularly. If ash builds up, it holds moisture and can make it harder to start your next fire.
- Safety First: Always keep a bucket of water or a garden hose nearby. Fact is, it only takes one stray spark to cause trouble.
- The „Metal Ring” Hack: If you’re worried about the heat damaging your bricks, you can buy a simple metal fire pit ring at most hardware stores for about $40. You just build your bricks around the ring. It acts as a shield and makes the whole structure much more durable.
- Use Dry Wood: Only burn seasoned hardwood like oak or maple. Softwoods like pine pop and spark a lot, which can be annoying.

This luxurious sunken fire pit design is the ultimate goal for a modern backyard. The under-bench lighting is a brilliant way to add safety and a high-end glow to the wood deck.
Executive Summary
Building a backyard fire pit doesn’t have to be a major financial burden. By using affordable materials like reclaimed bricks, sand, and gravel, you can create a beautiful and safe focal point for under $100. The key is in the preparation, level foundation, and proper airflow. Whether you’re roasting s’mores with the kids or sharing a glass of wine with friends, this DIY project will provide years of memories. Stop waiting for the „perfect” time and start building your own slice of paradise today.

I love the natural, rustic look of this stone-lined pit nestled into the hillside. It shows that you can work with the existing landscape to create something that feels like it’s always been there.

This classic backyard setup is exactly what I mean by attainable luxury. Simple chairs, a well-built pit, and warm string lights create a space where anyone would want to spend an evening.

Look at the texture on this curved wooden bench; it’s absolutely stunning. Storing the extra firewood directly under the seating is a smart, space-saving trick that also looks great.

The way the light filters through the trees in this photo is so dreamy. It’s a great reminder that the environment around your fire pit is just as important as the pit itself.
What is your favorite memory of sitting around a campfire?