

Forget everything you’ve seen in those over-the-top Halloween roundups. The dripping blood, the 3D eyeballs, the prosthetic wounds, the talons that make it impossible to open a can of seltzer. None of it is required.
I call the alternative spooky girl energy: nails and makeup that are clearly in on the holiday but still look good at work, at brunch, and in every photo you take through October. A tiny bat here. A red heart on the forehead there. Creepy, but make it cute.
And all of it is DIY-able on a budget, which matters because I have the hand steadiness of someone drinking their fourth coffee. My nails are painted with a bobby pin half the time and my makeup skills top out at “eyeliner, but only on the good eye.”
So here’s both halves of the look. Nine nail sets sorted by creep level with my full October routine, then five face looks you can draw with an eyeliner pencil and one red palette. No airbrush, no face paint, no art degree.
Spooky-Girl Nails, Explained
Spooky girl nails live in the space between “regular fall manicure” and “haunted house employee.” Close enough to Halloween to be fun, wearable enough that you don’t have to redo them before a work meeting.
Here’s the thing: gore reads as a costume, and costumes expire on November 1st. Subtle spooky reads as style, and style gets you a full month of wear out of one manicure.
Think little ghosts, thin webs, crescent moons, black french tips, one perfect jack-o’-lantern face. If a design needs more than three colors or an art degree, it doesn’t make the cut. That’s the whole filter, and it’s a forgiving one. Wobbly ghost? Still a ghost. Crooked web? Spiders aren’t perfectionists either.
The other argument for subtle: these are the designs you can actually paint yourself. Nobody is freehanding a realistic zombie on their non-dominant hand. (Ask me how I know.) Small motifs on one or two accent nails are within reach on your first try, and that’s the difference between a manicure you do and a manicure you keep pinning.
My October Nail Routine, Start to Finish
Every October I do two spooky manicures: one early in the month, one Halloween week. Same routine both times, faster than you’d expect.
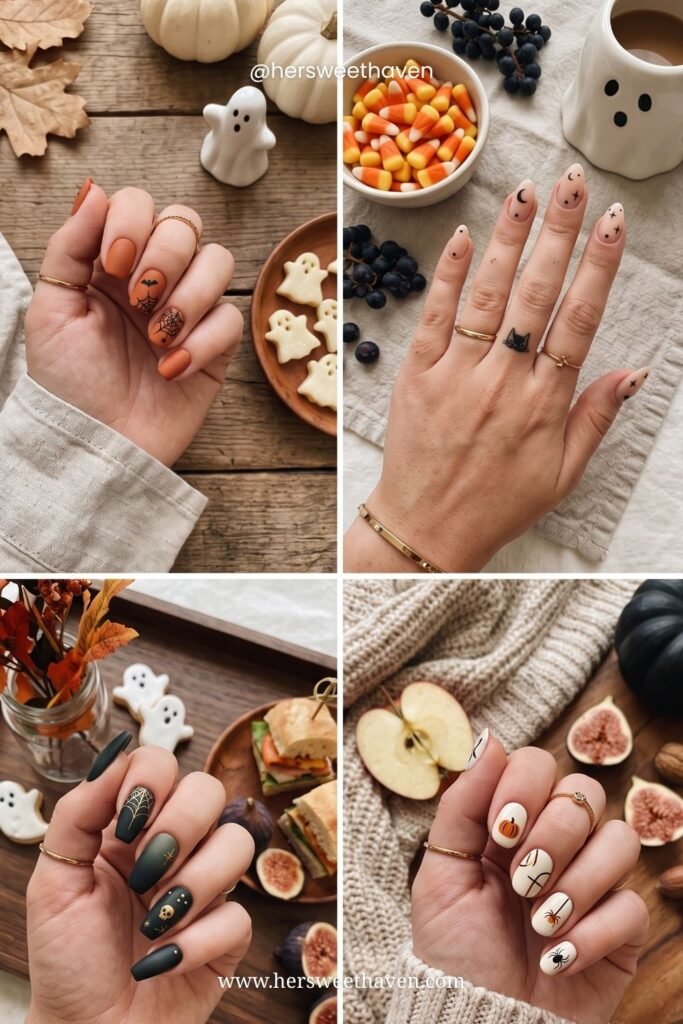
The Prep That Makes It Last
File, buff, push back cuticles, and wipe every nail with polish remover even if they look clean. That last wipe removes the oils that make polish chip by day two. Two minutes, doubled wear time.
Then base coat, always. Skipping it with dark polish is how you end up with stained yellow nails in November. (Learned that one the hard way during a black polish phase in college.)
The Painting Order That Saves Your Sanity
Paint your dominant hand first, while your steady hand still works. Base colors on all ten, then details, then topcoat once everything is truly dry.
A dotting tool (or a bobby pin) covers 90% of these designs. These Halloween nail art tutorials break down ghosts, webs, and bats stroke by stroke if you want to see the motions first.
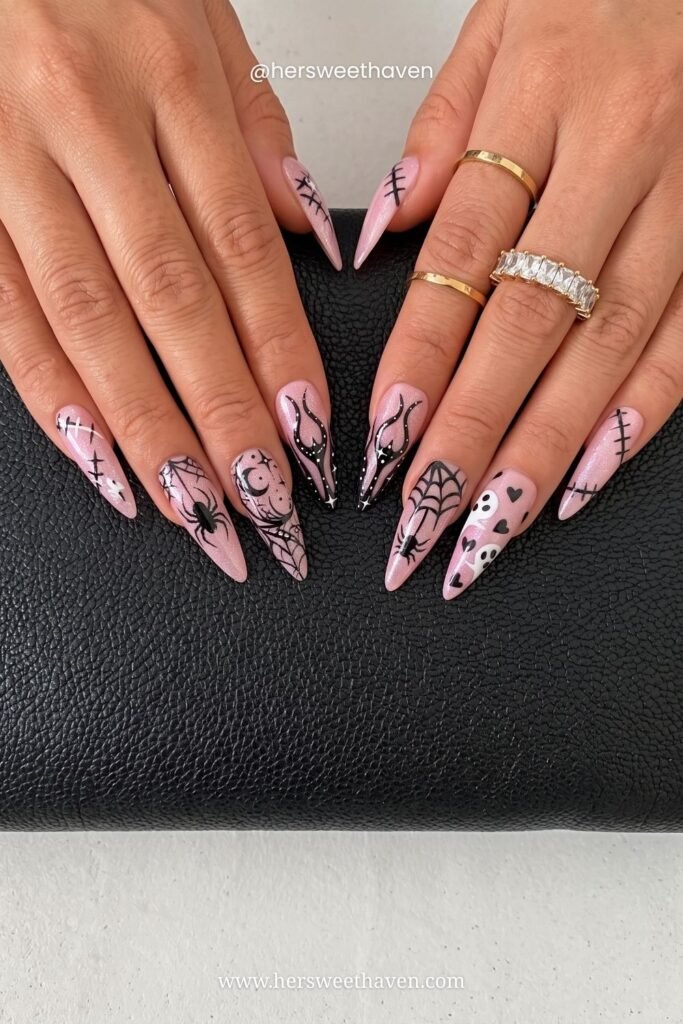
And if you’re a stiletto girl, this pink web set proves even soft pastel bases go spooky with a few thin black lines. Pink and creepy is a legitimate color story now.
The Three Rules of Just Enough Creep
One spooky element per nail. A ghost nail. A web nail. A plain nail. Never all three motifs stacked on one poor fingernail. Accent-nail thinking wins: two or three statement nails per hand, the rest simple.
Keep the base wearable. Start from colors you’d wear anyway: milky nudes, deep green, burgundy, soft pink. I pull most of my bases from my regular rotation (full list in my fall nail colors post) and add the creep on top. A wearable base means that even when a detail smudges, you still have a nice manicure underneath.
Mix, don’t match. Ten identical pumpkin nails is a lot of pumpkin. The sets that look expensive mix finishes and motifs: one matte, one glossy, one with art, one plain. Matte topcoat is the real secret here, by the way. It turns any black polish into instant velvet-goth for about six dollars.
The Subtle Sets (Creep Level: Whisper)
These four go to the office all month without a single raised eyebrow.
Black and White Minis
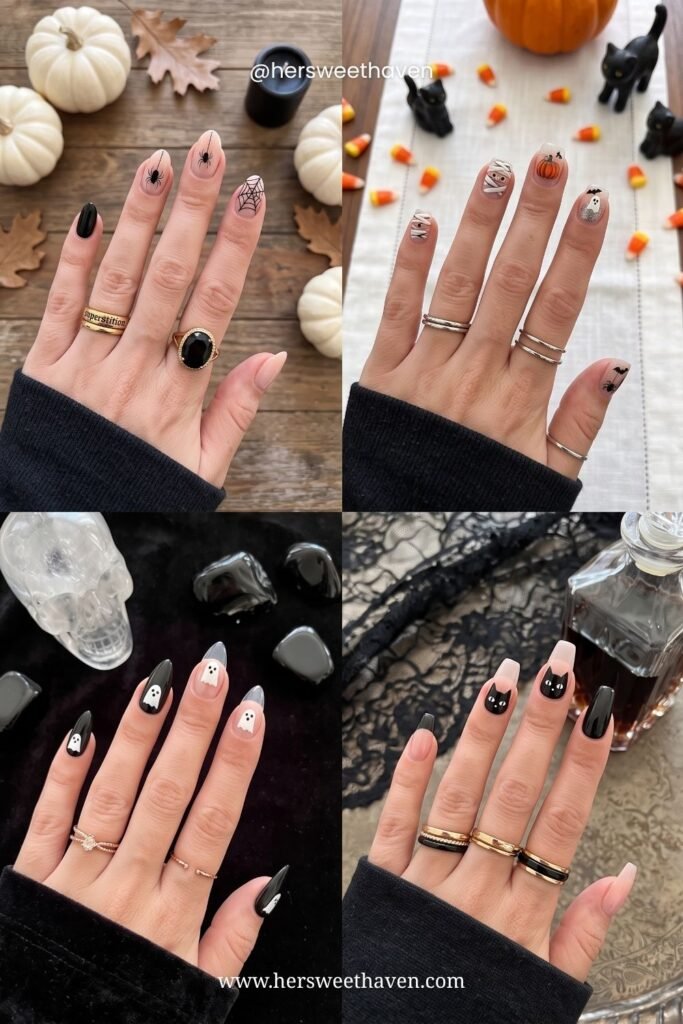
Tiny dots, thin lines, little stars, micro-ghosts on short nails. Proof you don’t need length for Halloween nail art. Short square nails carry these beautifully and survive real life.
The Bat-Accent Black French
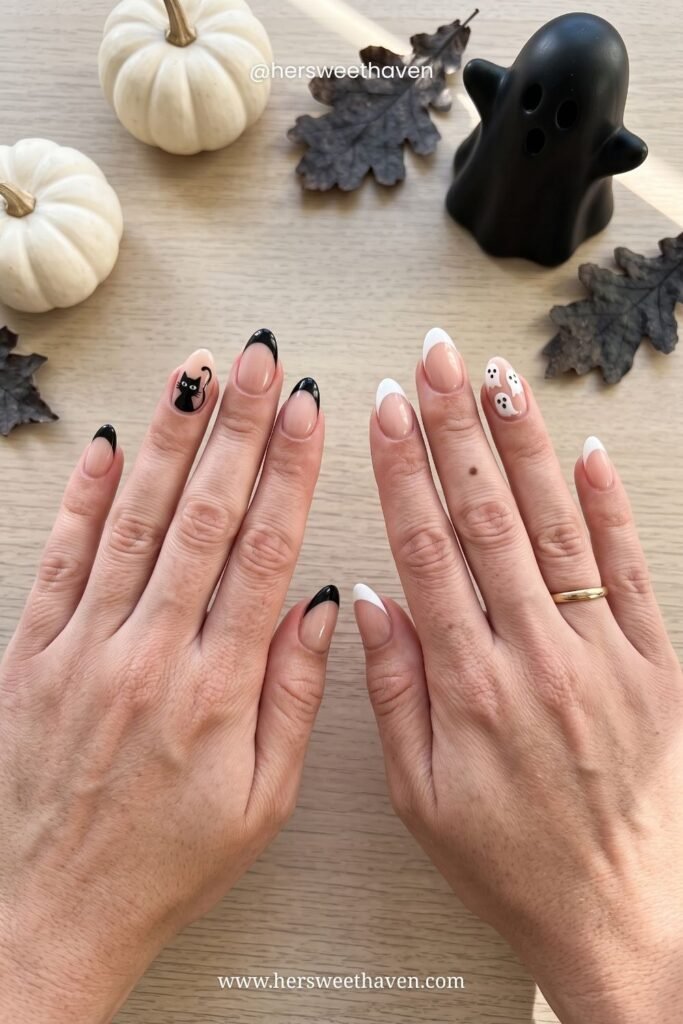
A classic french manicure with black tips instead of white, plus one tiny bat on the accent nail. If you already love the modern french wave (I rounded up favorites in these non-basic french tips), this is the lowest-effort way into spooky season.
Matte Black Everything
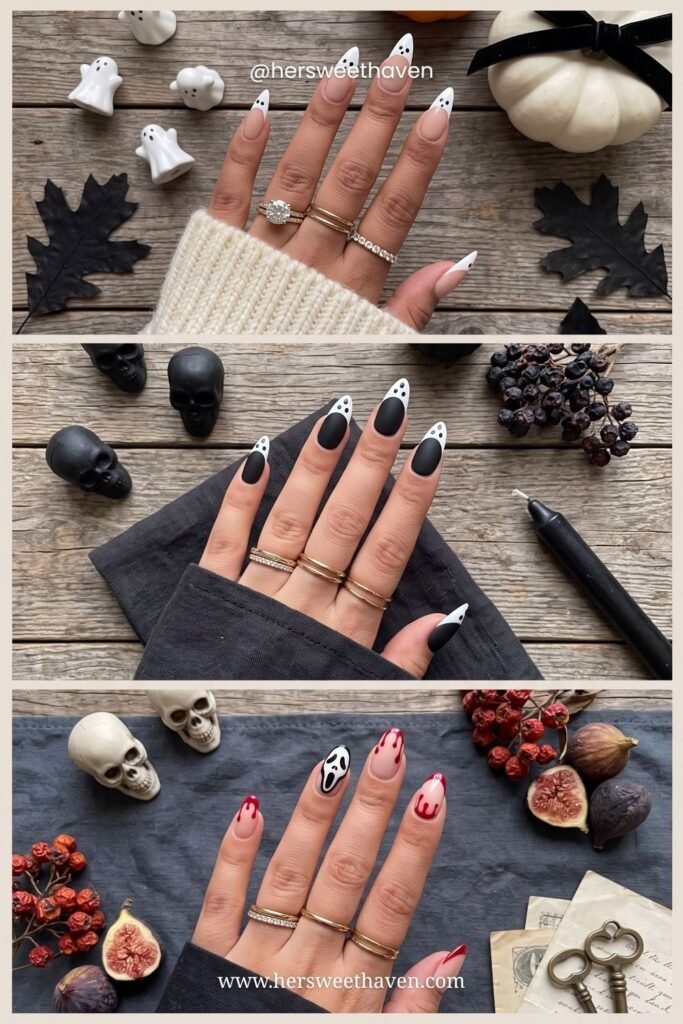
Matte black base, white ghost or web details on one or two nails. Moody, velvety, weirdly elegant. This one gets the most “wait, I love those” comments from people who claim to hate Halloween.
Moon and Ghost French
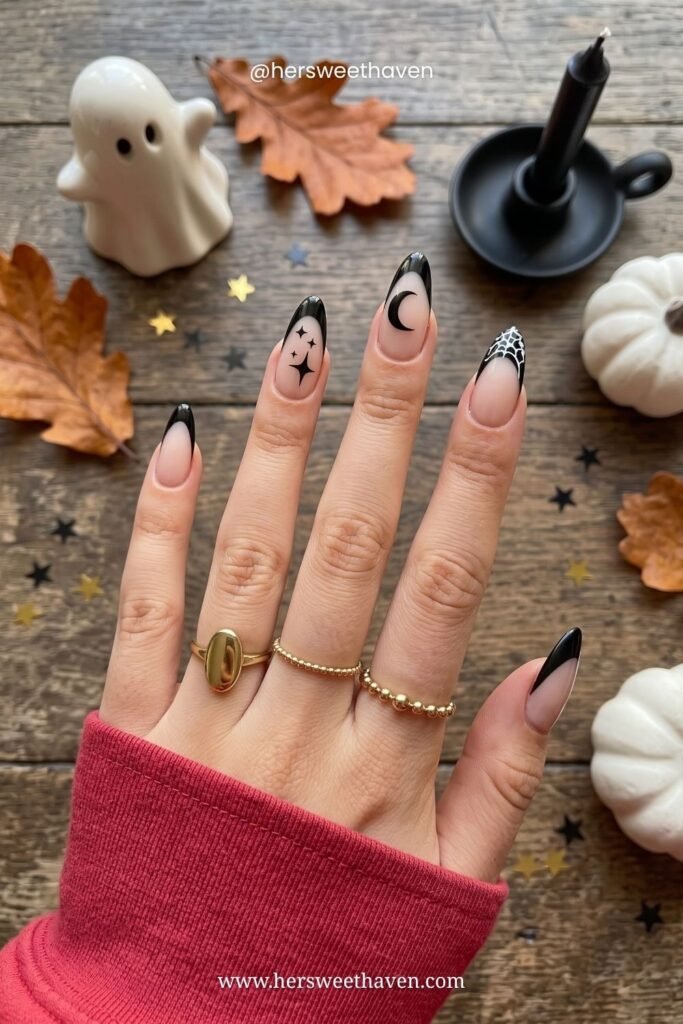
Sheer nude base, black tips, a crescent moon here, a tiny ghost there. Celestial-meets-spooky, and every element is dotting-tool simple. This is the set I’d pick for a first attempt.
The Full-Send Sets (Creep Level: Committed)
Halloween week deserves more. These three turn the creep up while staying completely DIY-able.
Skulls, Bows, and Bats
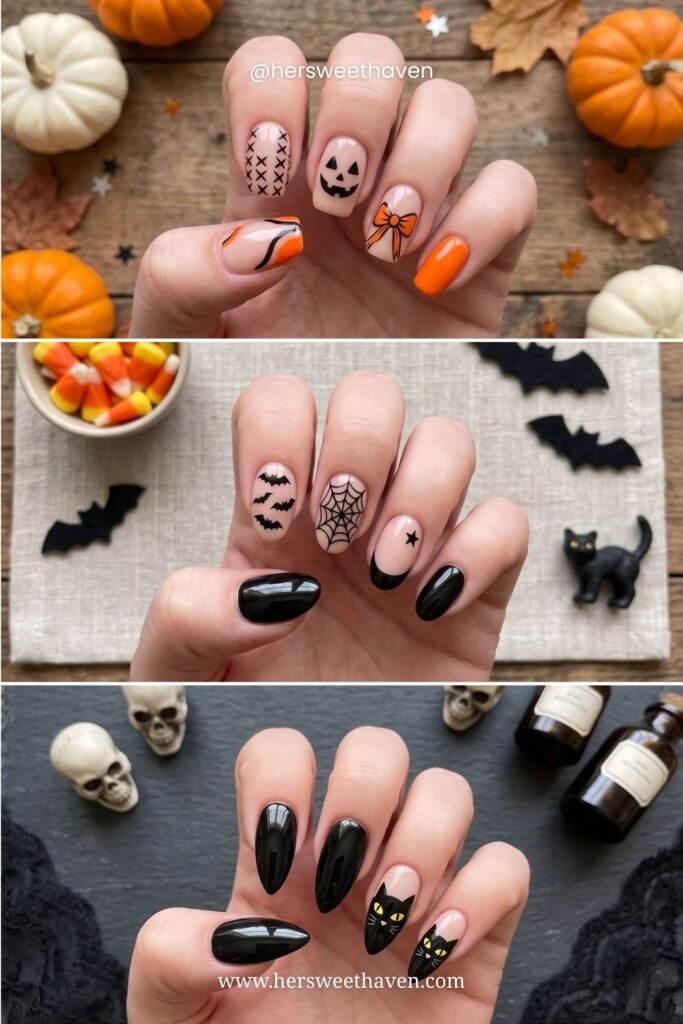
Black polish, white skulls, little bows, scattered bats: the coquette-goth mix that’s everywhere this season. The bow keeps it girly, the skulls keep it Halloween.
The Jack-o’-Lantern Almonds
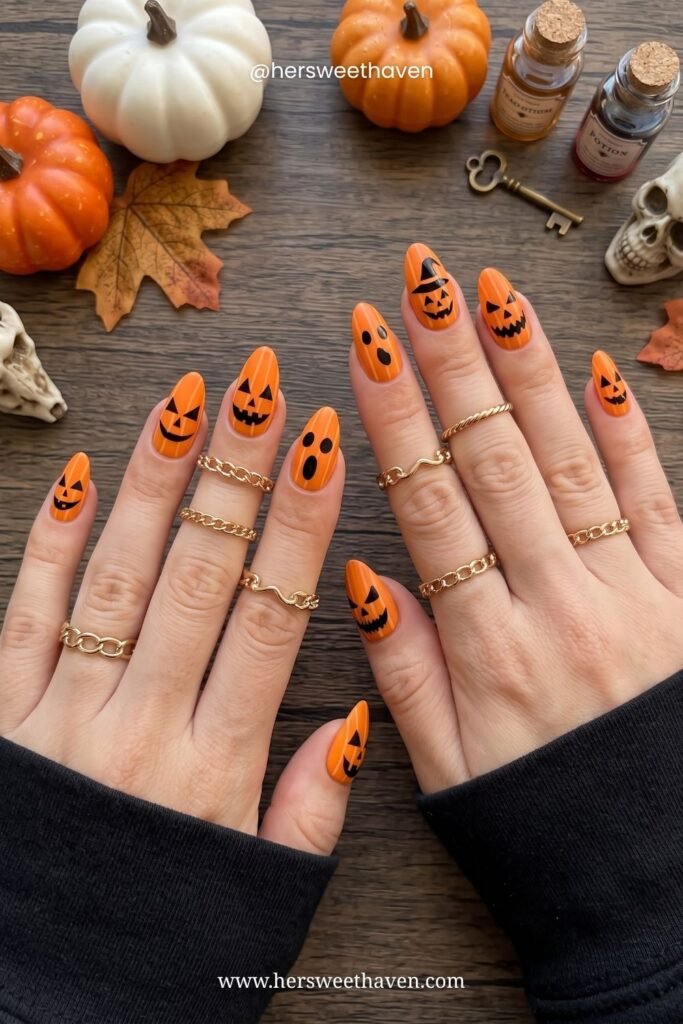
Bright orange almond nails with black jack-o’-lantern faces. Maximum holiday, minimum technique: the faces are triangles and a zigzag. If you love this shape year-round, my almond nail design roundup has plenty for after the pumpkins retire. (Results may include: compliments from strangers at the grocery store.)
The Spiderweb French
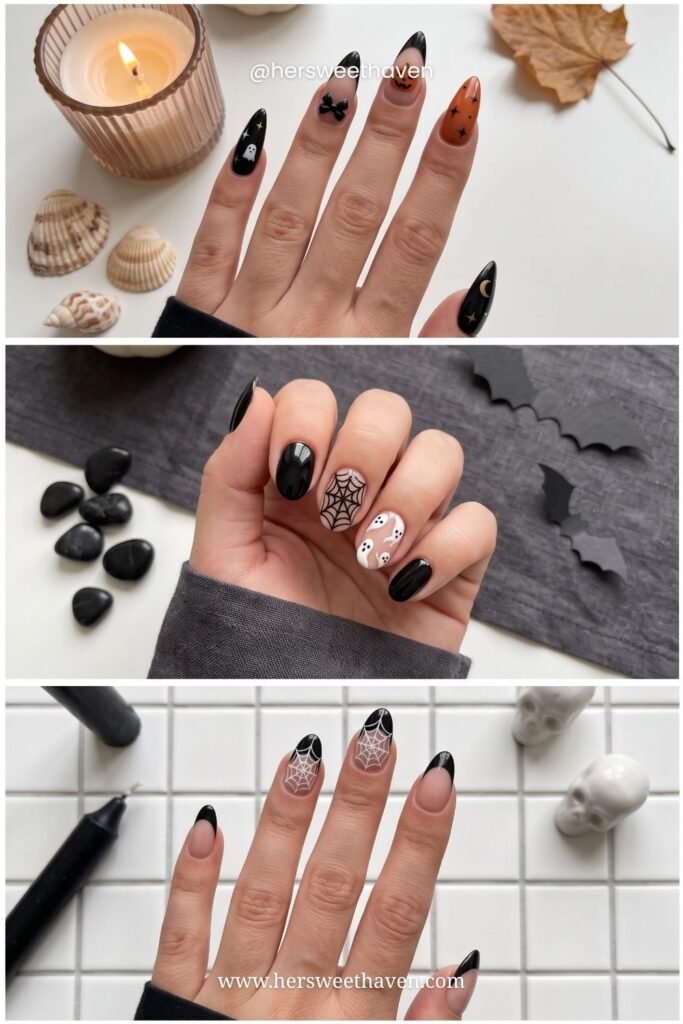
Black tips with thin white webs radiating from the corner. Webs look intimidating and truly aren’t: one curve plus connecting lines. This spider web nails tutorial shows the two easiest methods, including a sponge trick for shaky hands.
5 Makeup Looks You Can Do at Home
Now the face, and I need you to know I’m not qualified. My winged liner is uneven every single day of my life. I own one eyeshadow palette and I use two shades out of it.
Which is exactly why these five work. Not one of them needs face paint, blending skill, or anything you can’t buy at a drugstore. Look closely at all five and you’ll notice they’re the same three products doing different jobs.
The whole kit: a black eyeliner pencil or liquid liner, one warm red eyeshadow palette, a red or burgundy lip product, and setting spray. That’s it. Four things, and you probably own three of them.
Three rules make the difference between “did her face” and “clearly tried.”
Draw, don’t blend. Every look here is line work and dots, not gradients. Blending is the skill you don’t have and don’t need. If you can sign your name, you can draw a heart on your forehead.
One color story. Pick red or pick grey and commit. Four of these five looks run entirely on one warm red palette, and the repetition of a single shade across eyes, nose, and lips is what makes a five-minute face look coordinated instead of random.
Less is scarier. A clean face with three deliberate marks unsettles people far more than a fully painted one. Restraint also survives the night. Anything heavy is going to slide off by ten.
The Skin Prep Nobody Mentions
Moisturize, then primer, then your normal base. Liner and shadow grip much better on primed skin, and dry patches are where drawn lines go crooked.
Set with powder before you draw anything. Drawing on top of dewy foundation is how you get a smeared heart and a bad mood.
The Skull
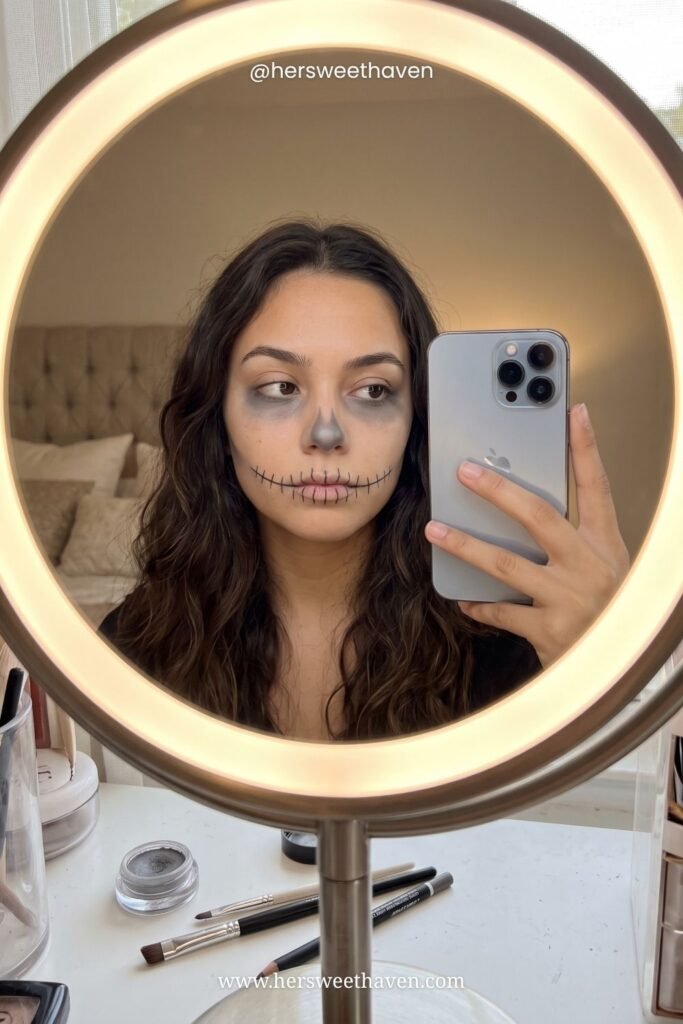
The trick nobody tells you: skip the white face paint entirely. Grey shadow smudged into the eye sockets, grey down both sides of the nose, and black liner stitches across the lips extending past the corners of your mouth.
That’s three moves. No white base means no cakey texture, no transfer onto your collar, and no forty-minute removal. It also reads better in photos, because the shading looks like actual bone structure instead of a mask. This easy skull makeup tutorial uses the same shadow-first logic if you want the full sequence.
Draw the stitches last and keep them uneven. Perfectly spaced stitches look printed.
The Little Mime
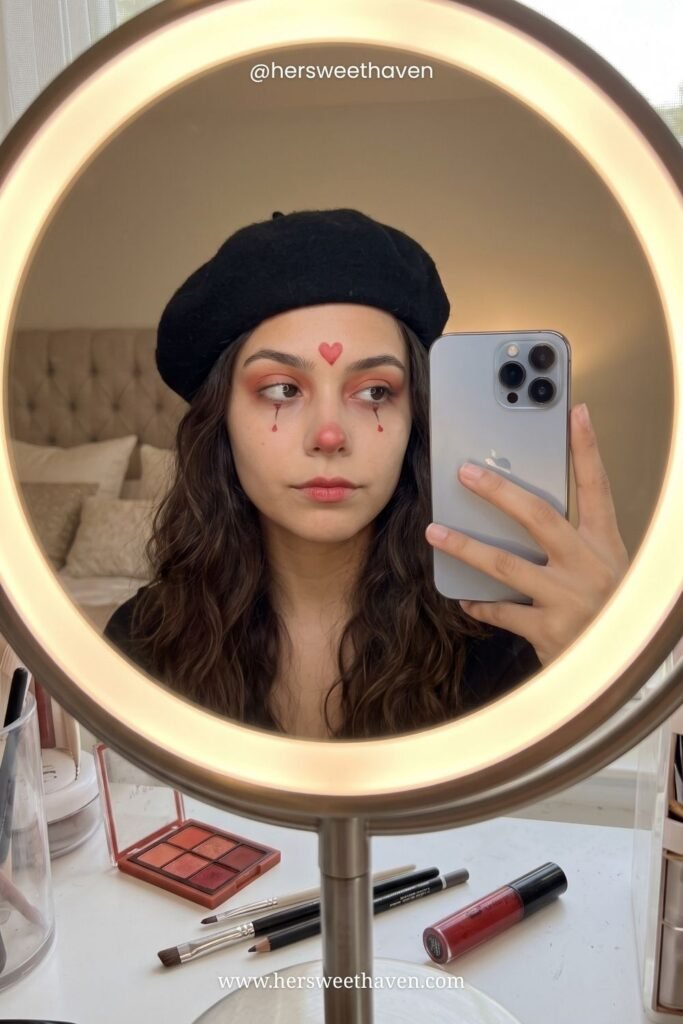
My favorite of the five, and the least effort. Warm red shadow washed all the way around the eyes, a small red heart on the forehead, red on the tip of the nose, and two tiny teardrops under each eye. Nude lip.
Then add a black beret and you’re done. The hat is doing half the costume, which is the whole point: one accessory plus five minutes of face means you never have to explain what you are.
Use the same red for the eyes, heart, nose, and drops. Repetition is what makes it look designed.
The Cute Clown
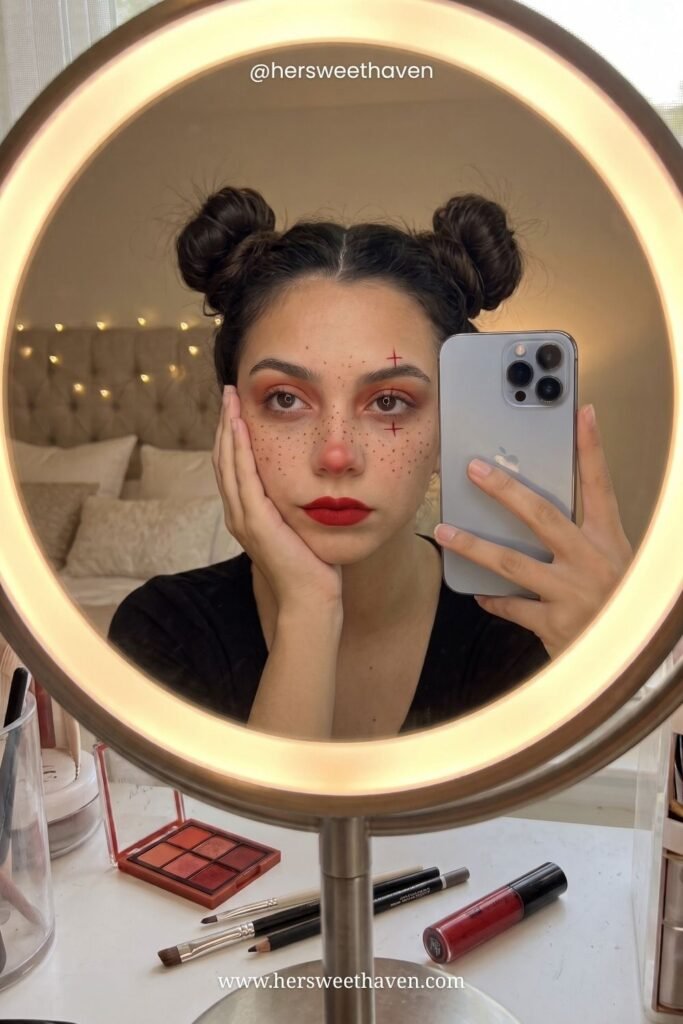
Same red palette, different mood. Red shadow around the eyes, a scatter of red freckles across the nose and cheeks, red nose tip, two little crosses (one on the brow, one under the eye), and a bold red lip.
Space buns finish it. The freckles are just dots with a liner pencil, done fast and messy on purpose, because evenly spaced freckles look like a rash. Dot them in random clusters and vary the size.
This one skews playful rather than scary, which makes it the safest pick if you’re going somewhere with kids or coworkers.
The Vampire
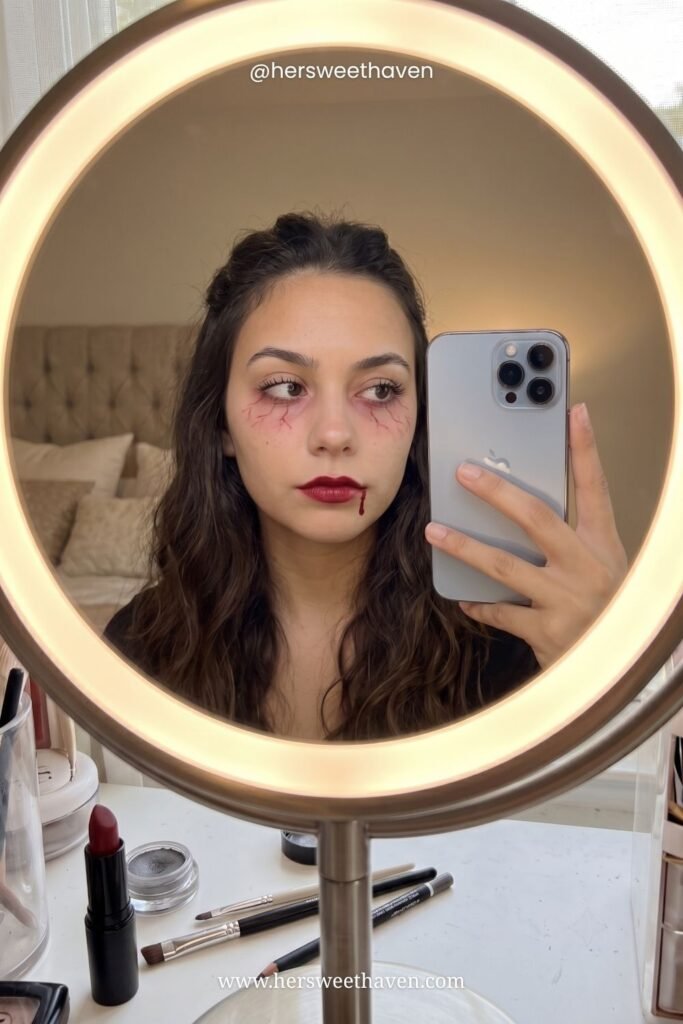
Thin red veins radiating out from under the eyes, a deep burgundy lip, and one drip from the corner of the mouth. Everything else stays clean and normal.
The restraint is the point. Full white face plus fangs plus a cape reads as a rental costume, while veins and one drip read as unsettling. Draw the veins with a fine red liner and make them branch like tree roots, thinner as they go outward. Blot once with a tissue so they sit under the skin rather than on top.
For the drip, a dot of burgundy lip gloss dragged down with a brush beats fake blood and won’t stain your shirt.
The Devil
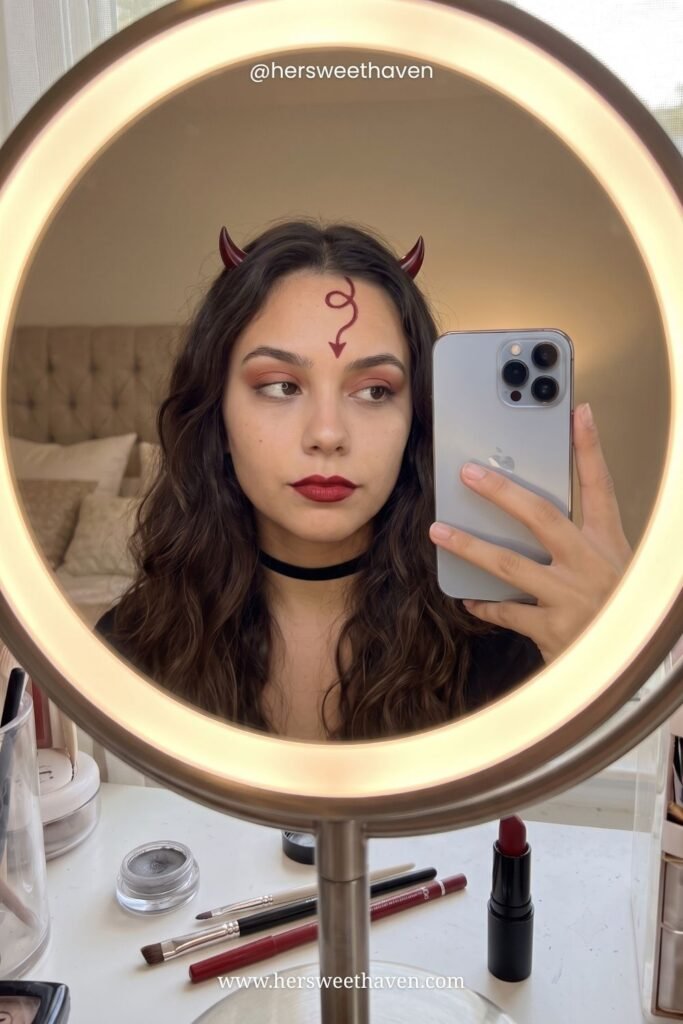
Red horn headband, a little pointed tail drawn on the forehead, warm red shadow, dark red lip, black choker. Ninety seconds of face plus two accessories.
This is the one I recommend to people getting ready in a bathroom at 8pm. The headband does the heavy lifting, the drawn tail is the detail that makes it look intentional, and the choker ties it together. If you need the rest of the outfit to match, my roundup of couples Halloween costumes that actually work has partner pairings for this exact look.
Your Halloween Nail and Makeup Questions
What Tools Do You Actually Need?
For nails: a dotting tool set (a few dollars online), a thin striping brush, base coat, topcoat, and three polishes in black, white, and one seasonal color. This beginner DIY Halloween nail guide runs on the same short list and swaps in bobby pins and tape for half of it.
For makeup: the four things listed above. Skip the Halloween-aisle face paint kits entirely. They’re chalky, they crack by 9pm, and they cost more than the eyeliner you already own.
How Long Does a DIY Manicure Last?
With proper prep and topcoat, seven to ten days before visible tip wear. Reapply topcoat every three days and you’ll stretch it closer to two weeks. Gel lasts longer but needs removal patience you have to be honest with yourself about.
What About Your Non-Dominant Hand?
The universal struggle. My fixes: detail work only on your dominant hand’s nails, plain bases and dots on the other, and brace both pinkies on the table while you paint.
Nobody inspects both hands. Seriously, no one has ever checked.
What If You Only Have Ten Minutes?
Devil, every time. Headband on, tail drawn, dark lip, done in under five, and the accessory carries the recognition so your drawing doesn’t have to be good.
If you have twelve minutes, do the mime. If you have fifteen and steady hands, the vampire veins are the highest payoff per minute of anything here. Save the skull for a night when you’re not also cooking.
On nails, the ten-minute version is black tips on all ten with one dotted ghost on each ring finger. Two products, one motif, still obviously Halloween.
How Do You Get the Face Makeup Off?
Easily, which is the reward for skipping face paint. Micellar water on a cotton pad takes off the liner and shadow, then your normal cleanser. The red pigments can stain slightly, so remove them first and don’t scrub.
Set everything with setting spray before you leave, though. Warm red shadow migrates, and drawn-on details smudge the second someone hugs you.
The Damage: Under $25 and One Cozy Evening
Real numbers, because I always want them too. Dotting tools, a striping brush, and three polishes come to about $22 from zero, less if you already own black polish (you do). The makeup kit is whatever you already have plus maybe one red palette.
Time-wise, one movie-length evening gets you a full set of nails, and every face look here is under ten minutes. Compare that to $60 and up for a salon Halloween set that lasts the same ten days, plus whatever a makeup appointment costs.
Pick your creep level, queue up something spooky, and go paint. October’s short.. get the good nails in while it counts.
Leave a Reply